分类目录归档:虚拟化

VMWARE WORKSTATION安装LINUX虚拟机时界面显示不全的解决办法

在部分版本的vmware workstation上安装linux虚拟机,比如centos、ubuntu等,会出现界面显示不全,导致无法直接点击按钮的问题,针对此问题,提供以下三种解决办法。

方法1是使用tab键切换至相关按钮。

方法2是按住alt的同时,鼠标左键点击并移动界面。

方法3是虚拟机设置——显示器——监视器分辨率,将该分辨率调小即可。

WINDOWS 2012安装VMWARE TOOLS报错的解决办法

VMware Workstation 15 Pro版本上安装windows server 2012虚拟机,虚拟机上安装vmware tools报错,报错内容是:

安装程序无法验证是否已安装所需的Microsoft更新KB2919355

网上有些办法是先安装 Microsoft Visual C++ 2017,但是有时候安装这个程序也会报错,经测试,并不需要安装该程序,至需要先安装补丁KB2919442,再安装补丁KB2919355,既可以正常安装vmware tools了。

VMWARE的FAILED TO LOG INTO NFC SERVER的解决办法

现有vmware esxi5.5,通过vsphere client连接,无法上传文件,且虚拟机控制台打不开,上传文件时报错“Failed to log into NFC server”。

查找资料发现可能为/etc/config/vmware配置文件问题,ssh连接上另一台esxi服务器,仔细对比配置文件,发现一模一样,并且重启管理代理服务,问题依旧。

vsphere client需要与esxi主机的443和902端口正常通信,测试下tcp 902端口,发现端口不通,修改中间网路设备相关策略,放通902端口后,可以正常上传文件并且控制台也可正常打开。

原来是网络端口不通,导致的问题。

VSAN主机磁盘出错处理步骤


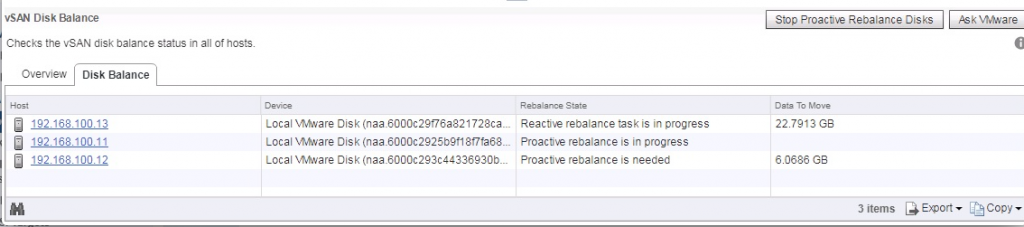
在vsan的vcenter控制台界面,发现有主机磁盘出错的告警信息,但是在服务器上并未出现任何告警。

此时点击报错主机,在监控——问题——所有问题下,查看告警信息,在监控——任务与事件中,查看具体告警信息,在具体的告警信息中,可以看到告警硬盘的UID号和NAA号。

点击群集,在配置——VSAN——磁盘管理下,可以看到告警主机的磁盘组,在磁盘组中可以根据NAA号定位出告警硬盘。

将该磁盘从磁盘组中移除,移除时点击将所有数据撤出到其他主机。

由于故障硬盘采用raid0配置,所以还需要关机更换硬盘。如果不采用raid,采用HBA或者JBOD这种直通模式,则可在线更换硬盘。

将该主机上的所有运行中的虚拟机迁移到其他主机上,迁移时选择更改计算资源和存储,如果DRS状态是全自动,可以将DRS状态改为手动,否则迁移后,虚拟机可能会根据DRS再次迁回至该主机。

将该主机关机,更换硬盘,将新硬盘配置成raid0,启动主机,在vcenter的vsan配置中,将新硬盘加入到vsan磁盘组中。

查看vsan容量,vsan故障磁盘处理完成。


VSAN6.5主机修改IP地址的步骤

现有四台vsan主机,组成一个集群,四台主机的IP地址分别为10.13.9.161、10.13.9.162、10.13.9.163、10.13.9.164,现需要将IP改为10.13.9.11、10.13.9.12、10.13.9.13、10.13.9.14。

操作步骤大概如下:
1、在vcenter上将该集群移除;
2、在每台esxi主机上,按F2进入,修改各IP地址;
3、在vcenter上新建集群,在新建集群下,添加四台主机,即可完成。

整个操作对业务没有影响。

vsan扩容——添加vsan主机节点的方法

增加新的ESXi主机到现有集群不仅可以增加vSAN集群的存储资源(磁盘),同时也可以增加vSAN集群的计算资源(CPU和内存),当然,如果新的主机没有磁盘组的话,我们也⽀持只作为计算资源加⼊到现有vSAN集群。增加新节点的过程主要包括:

1、检查新增ESXi主机的状态。我们建议和原vSAN集群中的主机使⽤相同型号以及ESXi的
版本,确保主机BIOS、⽹卡驱动固件符合ESXi的兼容性要求。除此以外,还需要确保
Raid控制器的硬件驱动固件以及所有磁盘的硬件固件都符合vSAN兼容性要求。

2、把新增ESXi主机注册到vCenter中,但是先不要加⼊到vSAN集群。

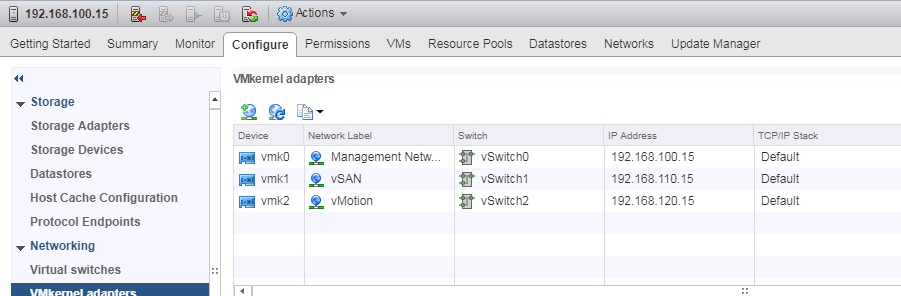
3、需要对新增主机进⾏相关的⽹络配置,包括配置vSAN端口、vMotion端口。

4、配置后状态如下:

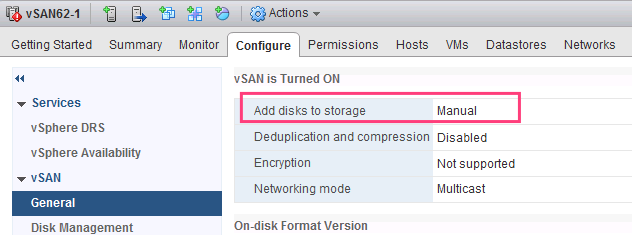
5、确保vSAN集群中添加磁盘模式为“⼿动”

6、把新增主机拖⼊到vSAN集群中:

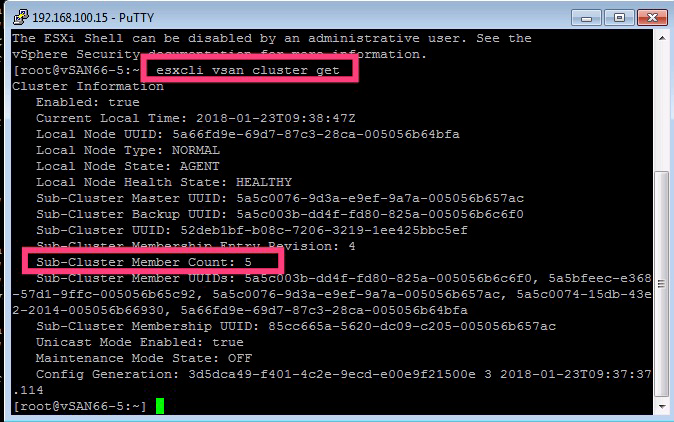
7、等添加任务完成后,检查当前vSAN集群中已经包含了新的主机。

或者命令⾏下执⾏esxcli vsan cluster get

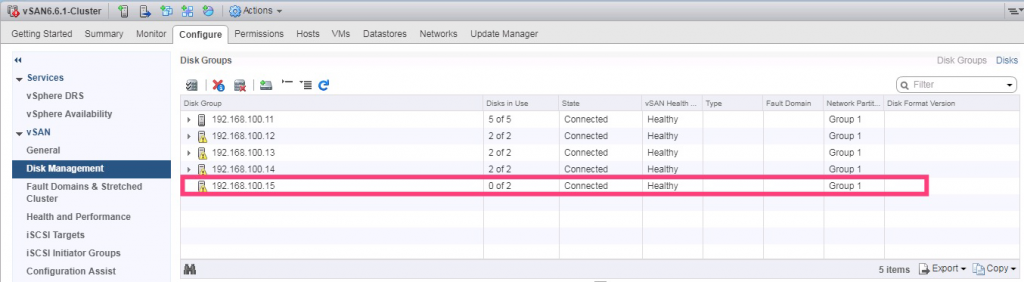
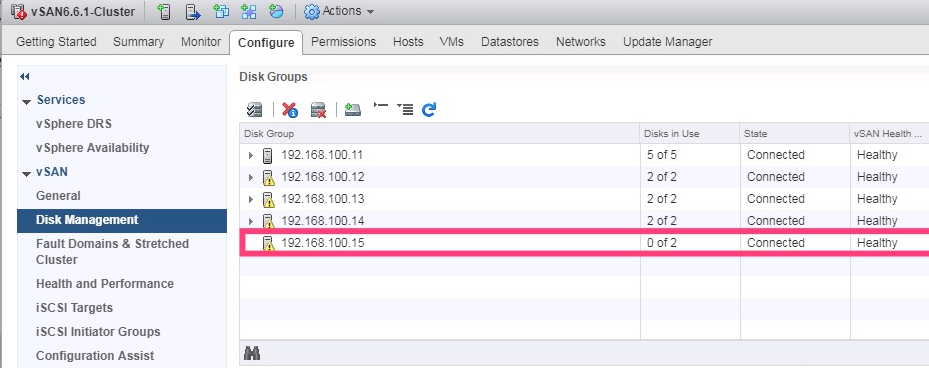
8、这时在vSAN磁盘管理界⾯⾥可以看到新增的主机,但是没有磁盘组。
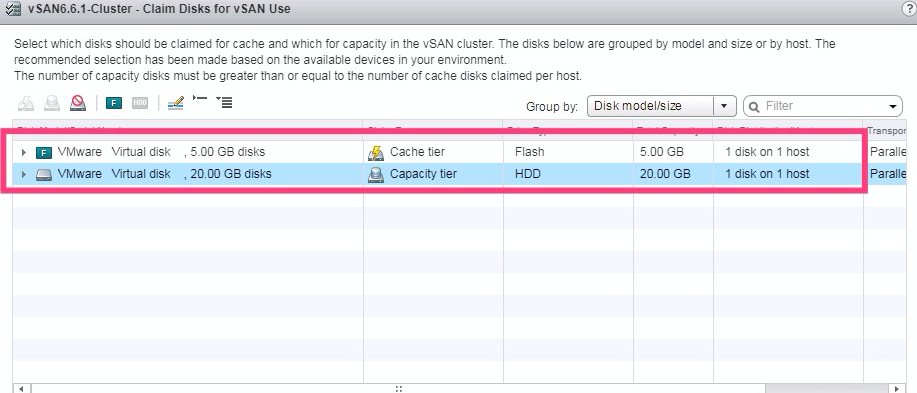
9、选择新增的主机,创建新的磁盘组。

10、选择缓存层磁盘和容量层磁盘。

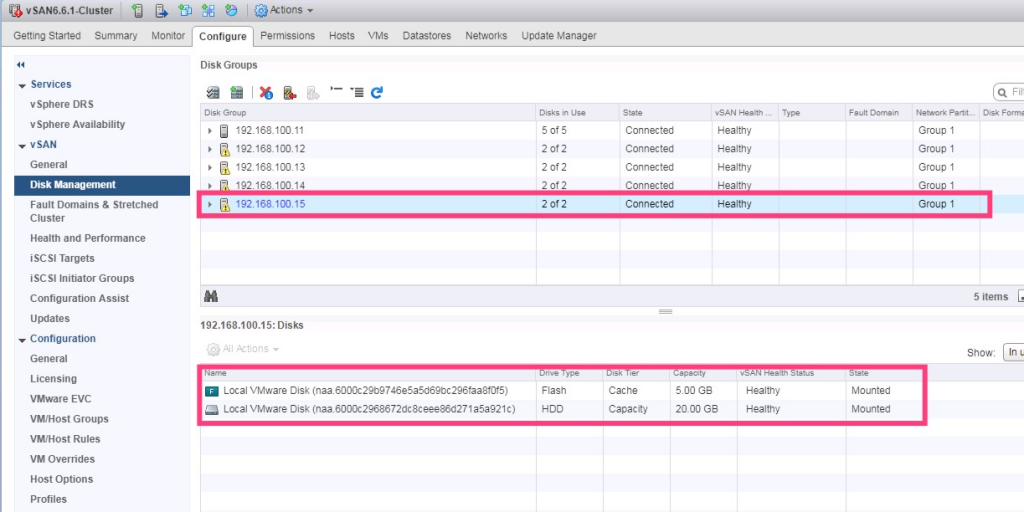
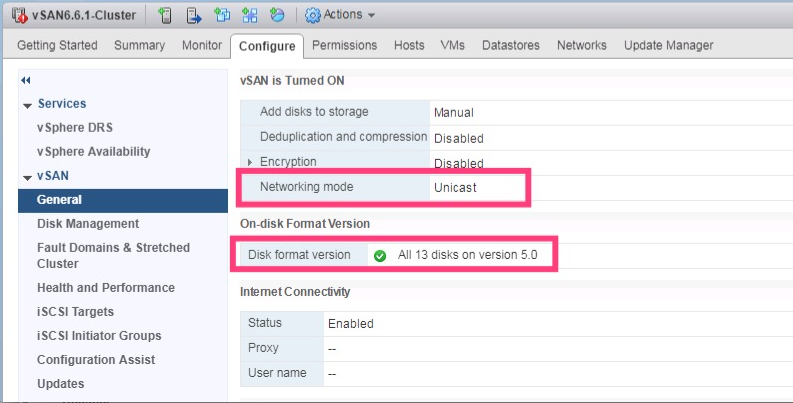
11、创建完成后,检查磁盘组状态以及磁盘格式版本。

12、添加主机后,如果vSAN中原有磁盘使⽤量没有超过80%,则vSAN不会开始进⾏数据平衡的操作。我们可以通过vSAN健康检查中“磁盘平衡”来⼿⼯触发数据平衡的操作。在后续的运⾏中vSAN会根据实际情况把数据存放在新加⼊的磁盘中,确保所有的磁盘使⽤率⼤致相同。如果开启的DRS,VM会⾃动迁移到新增主机上,使得所有主机负载相同。如果没有开启DRS,则需要⼿⼯迁移VM到新增主机。

ESXI中VMkernel和VM Network的区别

在vSphere的ESXi服务器上,有两大类型的端口组,分别是:
VM Network – 用于所有虚拟网路卡连接的端口,相当于物理交换机的下行端口组;
VMkernel – 它包含4个子接口,分别是:Management Traffic、vMotion、Fault Tolerance和IP Storage。
默认情况下,VMkernel下的4个子接口的IP地址,都可以用于vSphere Client或命令行登录管理。
Management Traffic – 这个接口主要用于配置vSphere HA时,管理网路心跳传输时用,如果不勾选,则意味着,没有vSphere HA没有心跳网路,将配置失败;
vMotion – 这个接口则用于支持将虚拟机从A ESXi主机在线迁移到B ESXi主机,如果没有这个接口,将无法迁移;
Fault Tolerance – 这个接口则用于支持虚拟机容错;
IP Storage – 这个接口被用于连接IP存储用,包括iSCSI和NFS存储,都可以。
默认情况下,可以把所有选项都勾选上,但是,这样一来,所有流量都将走同一个通道,容易形成相互干扰,进而导致对应的功能失败。因此,在生产环境中,建议独立划分不同的VMkernel子接口,以便完全保障对应业务的成功性。

如何在 ESXi 主机重建之后将主机重新添加到 vSAN 群集

要将 ESXi 主机重新加入 vSAN 群集,请执行以下操作:

  1. 安装主机,确保预留 vSAN 磁盘分区。
  2. 在主机上配置 vSAN VMkernel 端口组。
  3. 在 vCenter Server 中将主机重新连接到 Virtual SAN 群集。
  4. 使用 SSH 连接到 vSAN 群集中剩余的一台主机。
  5. 使用以下命令找到 vSAN Sub Cluster ID:

    # esxcli vsan cluster get

    您会看到类似以下内容的输出:

    Cluster Information
    Enabled: true
    Current Local Time: 2013-09-06T18:50:39Z
    Local Node UUID: 521b50a1-ad57-5028-ad51-90b11c3dd59a
    Local Node State: MASTER
    Local Node Health State: HEALTHY
    Sub-Cluster Master UUID: 521b50a1-ad57-5028-ad51-90b11c3dd59a
    Sub-Cluster Backup UUID: 52270091-d4c9-b9a0-377b-90b11c3dfe18
    Sub-Cluster UUID: 5230913c-15de-dda3-045e-f4d510a93f1c
    Sub-Cluster Membership Entry Revision: 1
    Sub-Cluster Member UUIDs: 521b50a1-ad57-5028-ad51-90b11c3dd59a, 52270091-d4c9-b9a0-377b-90b11c3dfe18
    Sub-Cluster Membership UUID: f3b22752-f055-bcc5-c622-90b11c3dd59a

  6. 使用在步骤 5 中找到的 Sub Cluster UUID 在新重建的 ESXi 主机上运行以下命令:

    # esxcli vsan cluster joinsub_cluster_UUID

    例如:

    # esxcli vsan cluster join -u 5230913c-15de-dda3-045e-f4d510a93f1c

  7. 运行以下命令,确认主机现在为 vSAN 群集的一部分:

    # esxcli vsan cluster get

    您会看到类似以下内容的输出:

    Cluster Information
    Enabled: true
    Current Local Time: 2013-09-06T11:51:51Z
    Local Node UUID: 522756f5-336a-8de0-791a-90b11c3e1fb9
    Local Node State: AGENT
    Local Node Health State: HEALTHY
    Sub-Cluster Master UUID: 521b50a1-ad57-5028-ad51-90b11c3dd59a
    Sub-Cluster Backup UUID: 52270091-d4c9-b9a0-377b-90b11c3dfe18
    Sub-Cluster UUID: 5230913c-15de-dda3-045e-f4d510a93f1c
    Sub-Cluster Membership Entry Revision: 1
    Sub-Cluster Member UUIDs: 521b50a1-ad57-5028-ad51-90b11c3dd59a, 52270091-d4c9-b9a0-377b-90b11c3dfe18, 522756f5-336a-8de0-791a-90b11c3e1fb9
    Sub-Cluster Membership UUID: f3b22752-f055-bcc5-c622-90b11c3dd59a

  8. 在 vCenter Server 中,刷新 vSAN 状态视图。所有主机现在都报告状态为“正常”。

扩展vsan集群,可参考vmware文档,请点击这里

深信服超融合linux系统P2V迁移说明

一、linux操作系统要求
1、CPU必须为64位;
2、内存大于等于2G;
3、硬盘不支持动态格式磁盘;
4、网卡至少有一块千兆以太网卡;
5、系统内核版本高于2.6.18,即redhat 5以上,centos 5以上,ubuntu 7以上,suse 11以上。

二、重启linux服务器,通过超融合系统安装镜像引导,在启动界面,选择“迁移物理机(P2V)”

此图像的alt属性为空;文件名为image-2.png


按提示操作,配置本地网卡的IP地址,超融合系统的IP、admin密码等,即可开始迁移过程。

在超融合控制台也可查看迁移进度。


vSphere 6.5密码重置(vCenter, SSO and ESXi)

Everyone knows the situation where you can’t log into a system because you have forgotten the password. The following article explains how to reset the password and regain access to VMware vSphere 6.5 core components including vCenter, SSO and ESXi Hosts.

  • Reset vCenter Server Appliance 6.5 root password
  • Reset SSO Administrator Password (vCenter Server Appliance 6.5)
  • Reset ESXi root password with Host Profiles
  • Gain Administrative ESXi access with an Active Directory
  • Reset ESXi root password (Linux Live CD)

Reset vCenter Server Appliance 6.5 root password

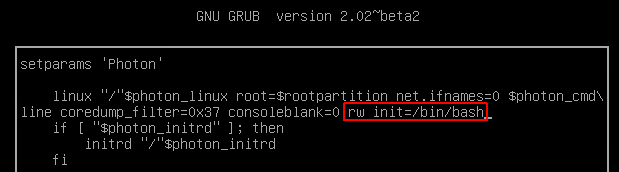
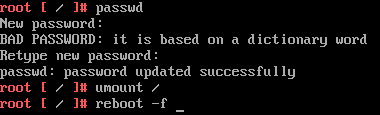
The following method provides steps to recover the vCenter Server Appliance (vCSA) root password. The process is slightly different compared to previous versions as the OS has been changed to PhotonOS. The method is officially supported by VMware and documented in KB2147144.

  1. Take a snapshot of the vCSA to be able to rollback in case of any problems during password recovery.
  2. Connect to the ESXi Host that runs the vCSA and open a remote console.
  3. Reboot the vCSA
  4. Press e immediately after the system starts (When the PhotonOS screen shows up)
  5. Append rw init=/bin/bash to the line starting with linux

  6. Press F10 to boot
  7. In the command prompt, enter passwd and enter a new root password twice
  8. Enter umount / to unmount the root filesystem
  9. Reboot the vCSA by running the command reboot -f
  10. Verify that you can log in with the new root password and delete the snapshot created in step 1.


Reset SSO Administrator Password (vCenter Server Appliance 6.5)

The following method provides steps to recover the SSO administrator password on a vCenter Server Appliance (vCSA). The method is officially supported by VMware and documented in KB2146224.

  1. Log in to the vCSA using SSH as root
  2. Enter shell to start the bash shell
  3. Identify the SSO Domain Name (Default is vsphere.local)
    # /usr/lib/vmware-vmafd/bin/vmafd-cli get-domain-name --server-name localhost

  4. Start the vdcadmintool

    # /usr/lib/vmware-vmdir/bin/vdcadmintool
  5. Press 3 (Reset account password)
  6. The tool asks for the Account UPN to reset. Enter Administrator@<DOMAIN> (identified in Step 3)
  7. The tool generates and displays a new password.
  8. Use the password to log in with the vSphere Web Client and change the password.


Reset ESXi root password with Host Profiles

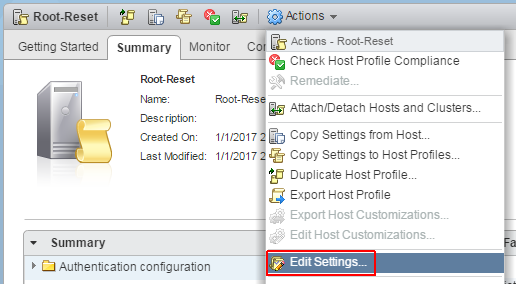
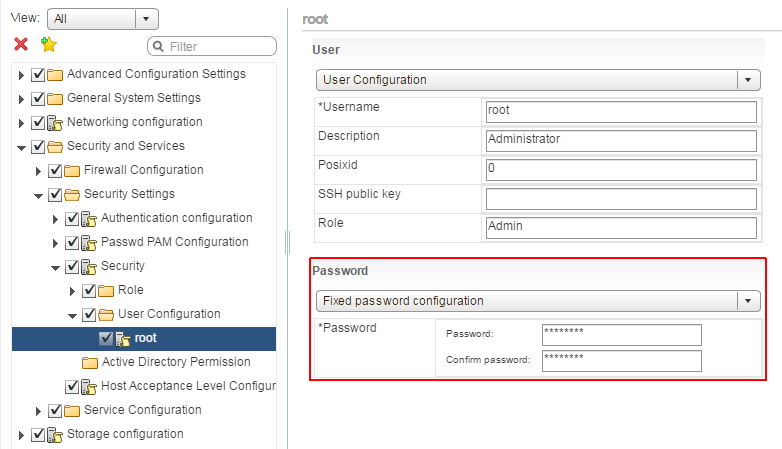
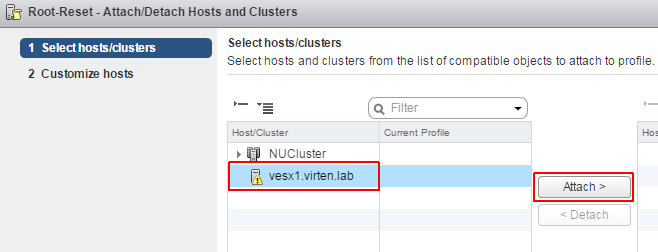
According to VMware KB1317898, “reinstalling the ESXi host is the only supported way to reset a password on ESXi”. However, there is a loophole as you can set the root password with Host Profiles under certain conditions. This method has two requirements:

  • The ESXi hosts needs to be managed by a vCenter
  • vSphere Enterprise Plus License is required to use Host Profiles

The vCenter uses a vpxuser to communicate with ESXi hosts, so it does not depend on the root account. As long as the ESXi host is managed by the vCenter, you can change the configuration without knowing the ESXi root password. This method works with all ESXi 5.x and 6.x versions.

  1. Create a Host Profile with the ESXi you want to reset the root password as reference Host
    Web Client > Right-Click the ESXi Host > Host Profiles > Extract Host Profile…
  2. Navigate to the Host Profile and select Actions > Edit Settings…
  3. Navigate to the root User Configuration
    Security and Services > Security Settings > Security > User Configuration > root
  4. Set the Password configuration to Fixed password configuration and enter a new password.
  5. Click Finish to close the profile configuration
  6. Right-Click the Host Profile and select Attach/Detach Hosts and Clusters…
  7. Highlight the ESXi host, Click Attach > and finish the configuration screen

  8. Put the ESXi host into maintenance mode
  9. Right-Click the ESXi host and select Host Profiles > Remediate…
  10. Finish the remediation wizard. The remediation should take less than a minute, no reboot is required.
  11. Use the new root password to login


Gain Administrative ESXi access with an Active Directory

When you don’t have the Enterprise Plus license, you can join an Active Directory to regain administrative access to the ESXi host. This method circumvents the limitation that root PW recovery is not supported.

  1. Login to the vCenter with the vSphere Web Client
  2. Navigate to ESXi > Configure > System > Authentication Services
  3. Click Join Domain…
  4. Enter the domain name and user credentials
  5. Click OK
  6. In the ESXi configuration, open System > Advanced System Settings
  7. Enter Config.HostAgent.plugins.hostsvc.esxAdminsGroup in the search field
  8. Change the settings to match the Administrator group that you want to use in the Active Directory. You can either create a new group in your direcotry or enter an existing group


Reset ESXi root password (Linux Live CD)

When you need to recover root access and the methods above are not applicable, the last method explains how to reset the root password with a Linux Live CD. Please be aware that this method is not supported by VMware as KB1317898 states: “reinstalling the ESXi host is the only supported way to reset a password on ESXi”. You can use any current Linux Live CD or installer CD that has a recovery mode. In this example I’m using Knoppix.

  1. Shutdown the ESXi host
  2. Boot the system with the Linux Live CD
  3. Make sure that you can read the gpt partition table, for example with parted /dev/sda print
  4. We are looking for the first fat16 partition with a size of 262MB. IT should be number 5.
  5. Mount the partition
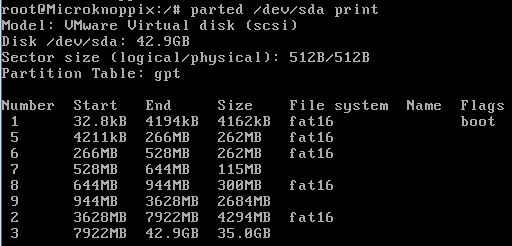
    # mount /dev/sda5 /media/sda5
  6. Verify that there is a current state.tgz in the directory.
  7. # ls -l /media/sda5/state.tgz

  8. The state.tgz file contains the local.tgz file which contains the configuration. Extract both to a temporary directory.
    # cd /tmp/
    # cp /media/sda5/state.tgz /tmp/state.tgz
    # tar -xf state.tgz
    # tar -xf local.tgz
  9. Edit the shadow file and remove the root password
    # vi etc/shadow

    Remove the hashed password until the second colon:

    You want a file that looks like this:

  10. Save the file and exit the editor (<ESC> :wq <ENTER>)
  11. Recreate state.tgz with the changed shadow file
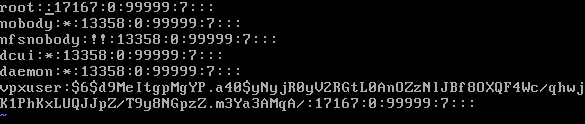
    # tar -czf local.tgz etc
    # tar -czf state.tgz local.tgz
  12. Move state.tgz back to ESXi partition and make sure to overwrite the old file
    # mv state.tgz /media/sda5/
  13. Reboot to ESXi. You should be able to access the DCUI or log in as root without a password.