分类目录归档:操作系统

Centos配置NFS挂载分区的办法

现有两台centos7.9服务器,服务器A上有个分区/data1/sky需要通过NFS挂载到服务器B上的/dataw/gggg分区。

在服务器A上安装NFS服务器端,在服务器B上安装NFS客户端,在服务器A上vi /etc/exports,加入内容/data1/sky/ *(rw,sync,no_root_squash,insecure),使用exportfs -ra生效。启动nfs服务,并让nfs服务开机自启,systemctl start nfs,systemctl enable nfs,并关闭防火墙systemctl stop firewalld.service,或者在防火墙放通相关端口服务,使用showmount -e 服务器A的IP地址验证下。

在服务器B上showmount -e 服务器A的IP地址可以看到需要挂载的服务器A的目录/data1/sky,vi /etc/fstab,加入服务器A的IP地址:/data1/sky /dataw/gggg nfs defaults 0 0,然后自动挂载mount -a,此时df -h可以看到挂载上的目录。

在服务器A的/data1/sky目录下添加文件,在服务器B的/dataw/gggg目录下可以正常查看到,反之亦可,配置完成。

linux配置ntp服务时报错/usr/sbin/ntpd: error while loading shared的解决办法

centos安装好ntp软件后,启动ntp服务报错,提示systemctl status ntpd.service查看具体详情,输入此命令发现/usr/sbin/ntpd: error while loading shared libraries: libopts.so.25,即缺失该文件。

使用ldd /usr/sbin/ntpd,也可以发现该文件缺失,显示libopts.so.25 => not found。

下载对应libopts文件并安装。

再次启动ntp服务,service ntpd start,显示启动正常,问题解决。

linux提示无法打开目录:输入/输出错误的解决办法

现有一台linux服务器,进入/date目录后使用ls命令,提示无法打开目录:输入/输出错误,这种情况可以尝试修复分区来解决该问题。

具体操作步骤如下:
1、尝试umount该分区,umount -f /date,可能会报繁忙,无法umount。
2、当出现umount报错时,使用lsof |grep /date,来查看占用该分区的进程。
3、使用kill -9 xxxxx关掉进程后,再umount -f /date,此时可以正常umount。
4、使用修复命令xfs_repair /dev/mapper/datexx,/dev/mapper/datexx为/date对应的文件系统名称,可通过df -h或者cat /etc/fstab查看。
5、如果xfs_repair /dev/mapper/datexx报错,则xfs_repair -L /dev/mapper/datexx清除文件系统的日志,再执行xfs_repair /dev/mapper/datexx修复。
6、修复完成后mount -a重新挂载分区,此时再进入/date目录执行ls恢复正常。

注意:此种方式存在损坏数据的风险,可能会造成数据丢失。

linux让CPU利用率占满的命令

linux操作系统中,让CPU利用率占满的命令:

for i in `seq 1 $(cat /proc/cpuinfo |grep “physical id” |wc -l)`; do dd if=/dev/zero of=/dev/null & done

cat /proc/cpuinfo |grep “physical id” | wc -l 可以获得CPU的个数, 我们将其表示为N。
seq 1 N 用来生成1到N之间的数字,
for i in seq 1 N; 就是循环执行命令,从1到N,
dd if=/dev/zero of=/dev/null 执行dd命令, 输出到/dev/null, 实际上只占用CPU,没有IO操作。
由于连续执行N个(N是CPU个数)的dd 命令, 且使用率为100%,这时调度器会调度每个dd命令在不同的CPU上处理。最终就实现所有CPU占用率100%。

这条命令会再后台去执行,如果想中断这条命令,可以执行:

1. fg 后按 ctrl + c (因为该命令是放在后台执行)
2. pkill -9 dd

fg命令可将后台命令恢复到前台执行。

该命令在很多场景非常有用。

iostat命令介绍

引言:

一、概述

二、iostat用法

(1).用法:iostat [选项] [<时间间隔>] [<次数>]

(2). 命令参数:

(3).示例:

1.显示所有设备的负载情况

2.iostat -m  以M为单位显示所有信息

3.iostat -d sda     显示指定硬盘信息

4.iostat -t   报告每秒向终端读取和写入的字符数

5.iostat -d -k 1 1    查看TPS和吞吐量信息

6.iostat -d -x -k 1 1      查看设备使用率(%util)、响应时间(await)

7.iostat -c 1 2   查看cpu状态    间隔1秒显示一次,总共显示2次

三、总结

引言:

iostat主要用于监控系统设备的IO负载情况,根据这个可以看出当前系统的写入量和读取量,CPU负载和磁盘负载。

一、概述

iostat 主要用于输出磁盘IO 和 CPU的统计信息。

iostat属于sysstat软件包。可以用yum install sysstat 直接安装。

二、iostat用法

(1).用法:iostat [选项] [<时间间隔>] [<次数>]

(2). 命令参数:

-c: 显示CPU使用情况

-d: 显示磁盘使用情况

-N: 显示磁盘阵列(LVM) 信息

-n: 显示NFS 使用情况

-k: 以 KB 为单位显示

-m: 以 M 为单位显示

-t: 报告每秒向终端读取和写入的字符数和CPU的信息

-V: 显示版本信息

-x: 显示详细信息

-p: [磁盘] 显示磁盘和分区的情况

(3).示例:

1.显示所有设备的负载情况

cpu属性值说明:

%user:CPU处在用户模式下的时间百分比。

%nice:CPU处在带NICE值的用户模式下的时间百分比。

%system:CPU处在系统模式下的时间百分比。

%iowait:CPU等待输入输出完成时间的百分比。

%steal:管理程序维护另一个虚拟处理器时,虚拟CPU的无意识等待时间百分比。

%idle:CPU空闲时间百分比。

备注:

如果%iowait的值过高,表示硬盘存在I/O瓶颈,%idle值高,表示CPU较空闲,如果%idle值高但系统响应慢时,有可能是CPU等待分配内存,此时应加大内存容量。%idle值如果持续低于10,那么系统的CPU处理能力相对较低,表明系统中最需要解决的资源是CPU。

disk属性值说明:

磁盘名称

device:磁盘名称

tps:每秒钟发送到的I/O请求数.

Blk_read/s:每秒读取的block数.

Blk_wrtn/s:每秒写入的block数.

Blk_read:读入的block总数.

Blk_wrtn:写入的block总数.

2.iostat -m  以M为单位显示所有信息

3.iostat -d sda     显示指定硬盘信息

4.iostat -t   报告每秒向终端读取和写入的字符数

5.iostat -d -k 1 1    查看TPS和吞吐量信息

6.iostat -d -x -k 1 1      查看设备使用率(%util)、响应时间(await)

说明:

tps:每秒钟发送到的I/O请求数。

Blk_read/s:每秒读取的block数。

Blk_wrtn/s:每秒写入的block数。

Blk_read:读入的block总数。

Blk_wrtn:写入的block总数。

rrqm/s: 每秒进行 merge 的读操作数目。即 rmerge/s

wrqm/s: 每秒进行 merge 的写操作数目。即 wmerge/s

r/s: 每秒完成的读 I/O 设备次数。即 rio/s

w/s: 每秒完成的写 I/O 设备次数。即 wio/s

rkB/s: 每秒读K字节数。是 rsect/s 的一半,因为每扇区大小为512字节。

wkB/s: 每秒写K字节数。是 wsect/s 的一半。

avgrq-sz: 平均每次设备I/O操作的数据大小 (扇区)。

avgqu-sz: 平均I/O队列长度。

rsec/s: 每秒读扇区数。即 rsect/s

wsec/s: 每秒写扇区数。即 wsect/s

r_await:每个读操作平均所需的时间

不仅包括硬盘设备读操作的时间,还包括了在kernel队列中等待的时间。

w_await:每个写操作平均所需的时间

不仅包括硬盘设备写操作的时间,还包括了在kernel队列中等待的时间。

await: 平均每次设备I/O操作的等待时间 (毫秒)。

svctm: 平均每次设备I/O操作的服务时间 (毫秒)。

%util: 一秒中有百分之多少的时间用于 I/O 操作,即被io消耗的cpu百分比

备注:

如果 %util 接近 100%,说明产生的I/O请求太多,

I/O系统已经满负荷,该磁盘可能存在瓶颈。如果 svctm

比较接近 await,说明 I/O 几乎没有等待时间;如果 await

远大于 svctm,说明I/O 队列太长,io响应太慢,则需要进行必要优化。

如果avgqu-sz比较大,也表示有当量io在等待。

7.iostat -c 1 2   查看cpu状态    间隔1秒显示一次,总共显示2次

iostat 1 5

间隔1秒,总共显示5次

iostat -d 2

每隔2秒,显示一次设备统计信息.

iostat -d 2 3

每隔2秒,显示一次设备统计信息.总共输出3次.

iostat -x sda sdb 2 3

每隔2秒显示一次sda, sdb两个设备的扩展统计信息,共输出3次.

iostat -p sda 2 3

每隔2秒显示一次sda及上面所有分区的统计信息,共输出3次.

 三、总结

iostat是Linux中被用来监控系统的I/O设备活动情况的工具,是input/output statistics的缩写。它可以生成三种类型的报告:

CPU利用率报告

设备利用率报告

网络文件系统报告

iostat通过生成的报告来帮助管理员更好的调整系统设置来平衡各个物理磁盘之间的I/O负载。

centos7挂载本地yum源的方法

centos7虚拟机环境,光驱连接centos安装镜像。

一、创建目录挂载镜像
mkdir -p /mnt/cdrom
mount /dev/sr0 /mnt/cdrom/

二、创建本地yum源
在/etc/yum.repos.d目录下创建local.repo文件,写入内容:
[local]
name=local repo
baseurl=file:///mnt/cdrom
enable=1
gpgckeck=1
gpgkey=file:///mnt/cdrom/RPM-GPG-KEY-CentOS-7

三、将/etc/yum.repos.d目录下其余文件删除,或者移动到别的目录,使得/etc/yum.repos.d目录下只有local.repo

四、更新yum源
yum clean all
yum makecache
yum repolist all
步骤完成,可以使用yum命令安装了。

linux新增一块硬盘并做LVM分区的方法

linux新增了一块硬盘,首先通过fdisk -l查看:

然后fdisk /dev/vdb创建分区

以此输入n p

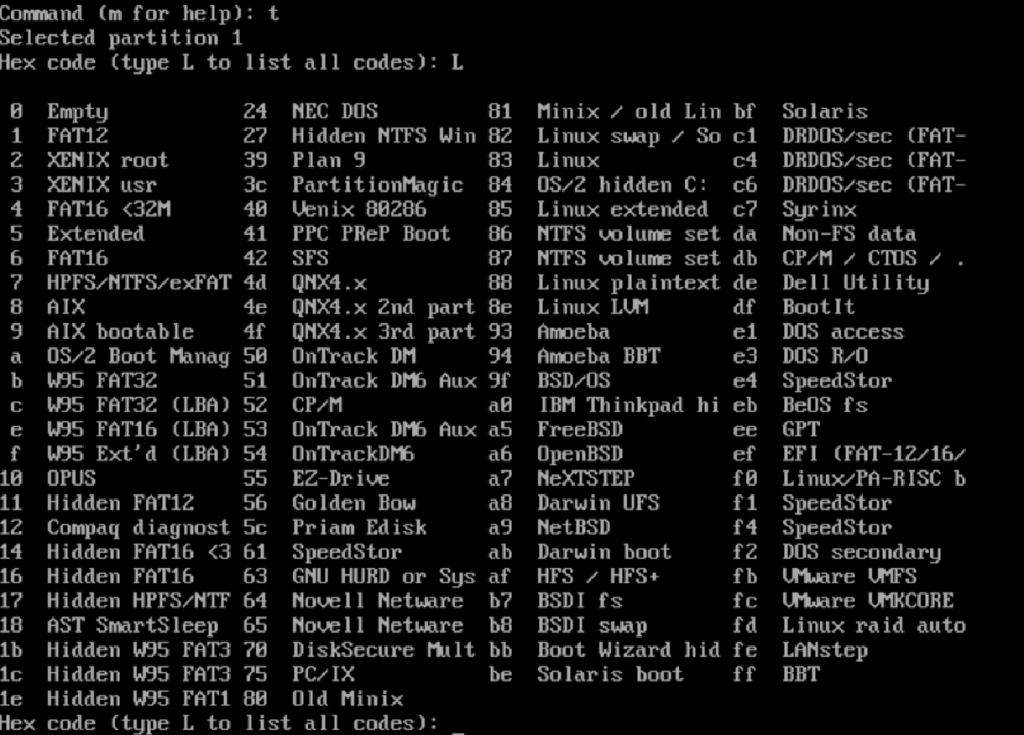
first sector和last sector默认,直接回车,输入t L

输入8e,采用LVM分区

按w保存。

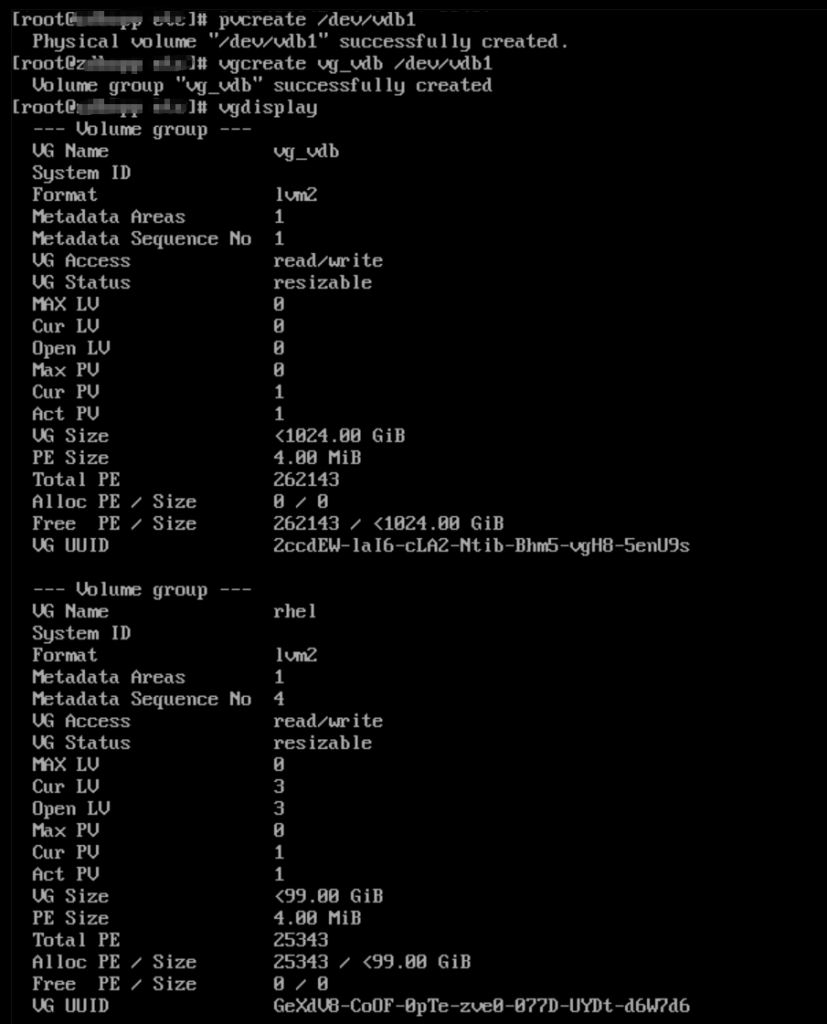
然后pvcreate /dev/vdb1,vgcreate vg_vdb /dev/vdb1

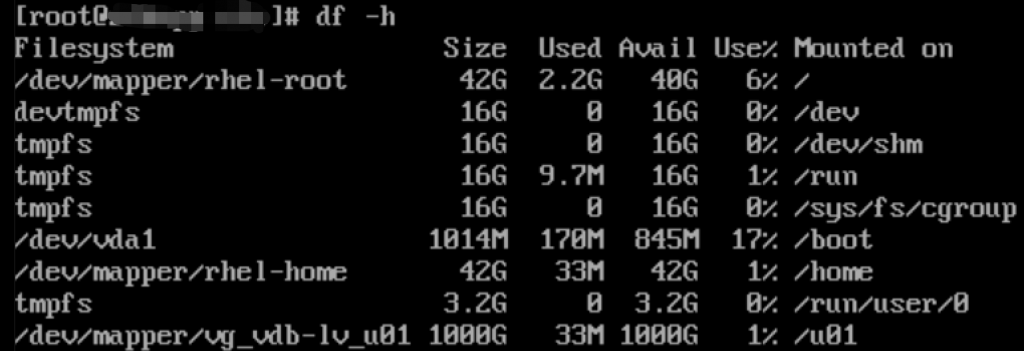
lvcreate -L 1000G -n lv_u01 vg_vdb,mkfs.xfs /dev/vg_vdb/lv_u01

新建/u01目录,挂载分区mount /dev/vg_vdb/lv_u01 /u01

在/etc/fstab中添加/dev/mapper/vg_vdb-lv_u01 /u01 xfs defaults 0 0,即可。

Linux LVM分区扩容方法,可以参见https://www.eumz.com/2018-04/1461.html

redhat5、redhat6安装HP DL380 DL580 G5 G6服务器网卡驱动步骤

Installing the RPM Package

  1. This package requires a build environment. Please refer to the
    “Build Environment Setup” Section before proceding to the next step.
  2. Install the source RPM package. rpm -ivh hp-e1000e-.src.rpm
  3. Build the binary RPM for the e1000e driver. RHEL 5: rpmbuild -bb /usr/src/redhat/SPECS/hp-e1000e.spec RHEL 6: rpmbuild -bb ~/rpmbuild/SPECS/hp-e1000e.spec SLES: rpmbuild -bb /usr/src/packages/SPECS/hp-e1000e.spec If you get an error during the build process, refer to the
    “Build Environment Setup” section. NOTE: One can build binary RPM for a specfic kernel flavor as follows: rpmbuild -bb SPECS/hp-e1000e.spec –define “KVER ” NOTE: RHEL 5 x86 installations require the “–target” switch when
    building on Intel compatible machines. Please see the “Caveats”
    section below for more details. rpmbuild –target=i686 -bb /usr/src/redhat/SPECS/hp-e1000e.spec
  4. Check for the existence of a current version of the e1000e package as follows: RHEL rpm -q kmod-hp-e1000e- SLES rpm -q hp-e1000e-kmp- If an old version of the package exists, the RPM package should be
    removed. Remove the corresponding tools package before removing
    driver package. RHEL rpm -e kmod-hp-e1000e- SLES rpm -e hp-e1000e-kmp- Verify if the old hp-e1000e package has been removed as follows: RHEL rpm -q kmod-hp-e1000e- SLES rpm -q hp-e1000e-kmp-
  5. Install the new binary RPM package. RHEL 5 rpm -ivh \ /usr/src/redhat/RPMS//kmod-hp-e1000e–..rpm RHEL 6 rpm -ivh \ ~/rpmbuild/RPMS//kmod-hp-e1000e–..rpm The modules are installed in the following directory:
    /lib/modules//extra/hp-e1000e Note: The “–nodeps” switch is required when installing on RHEL 5.5. See
    “Caveats” section below for more details. rpm -ivh \ /usr/src/redhat/RPMS//kmod-hp-e1000e–..rpm –nodeps SLES rpm -ivh RPMS//hp-e1000e-kmp–..rpm The modules are installed in the following directory:
    /lib/modules//updates/hp-e1000e
  6. Configure your network setting and address. You may need to refer to your
    Linux vendor documentation. Helpful network configuration tools such as
    “yast2” in SLES or linuxconf/redhat-config-network/netconfig in Red Hat
    exist for easy configuration.

For SLES, user may have to specify the module as e1000e while configuring
the network. The module can be specified in Hardware Details of Advanced
configuration

  1. Ensure that the /etc/modules.conf file is configured similar to the example
    listed below. The example below is presented as if more than one adapter is
    present. If so, one eth# instance should exist for each ethernet port. Refer to
    the modules.conf man page for more information. alias eth0 e1000e
    alias eth1 e1000e

For SLES, the configuration file is /etc/modprobe.conf or /etc/modprobe.conf.local

  1. You can now reboot your server or restart the network services. Upon reboot
    the network should start with the e1000e driver loaded

To verify that the e1000e driver is loaded use the following command.

# lsmod

You should find e1000e listed. You can also verify if the correct e1000e driver is
loaded through any of the following methods. Note that version of the driver loaded
should be same as that of the package version.

A. Look for driver load messages in the system log.

#dmesg | grep Intel

You should see messages of the following type,

Intel(R) PRO/1000 Network Driver - version x.x.x

B. Check the /var/log/messages file for a similar message as indicated in method A.

Note: To load the driver from command line use ‘modprobe’ instead of ‘insmod’.
Refer to the man pages for lsmod, ifconfig, rmmod, insmod, modprobe, modules.conf
and modprobe.conf for more detailed information.

Uninstalling the RPM

The following command will uninstall the RPM.

Red Hat
# rpm -e kmod-hp-e1000e-<kernel flavor>

SLES
# rpm -e hp-e1000e-kmp-<kernel flavor>

Limitations

Some Linux distributions may not add the default route back to a specified network
device when a network stop/start command is used. Use the route command to add the
default router back to the network device.

Some Linux distributions may not add the default assigned IP address back to a
specified network device when using the following:

ifconfig eth(x) down
rmmod <module name>
insmod <module name> <optional parameter changes>
ifconfig eth(x) up

Another step to reassign the IP address back to the device may be required:

ifconfig eth(x) <ip address>

Some Linux distributions may add multiple IP addresses with the same system name in
the /etc/hosts file when configuring multiple network devices.

电脑配置静态地址无法ping通网关问题处理说明

现有一台电脑接了双网卡,连接外网网卡配置IP地址网关,连接内网的网卡通过DHCP获取地址,由于此时系统上有两个网关,会导致部分网段无法正常访问,需要将内网的网关去掉,到内网网段写路由。关于双网卡的配置,参见windows下双网卡双网关的设置https://www.eumz.com/2012-05/251.html

该内网网卡DHCP获取到的地址是192.168.1.113/24,网关192.168.1.1,此时关闭DHCP,配置静态地址192.168.1.113和24位掩码,不配置网关,此时发现ping网关192.168.1.1不通。在电脑接入的交换机上查看DHCP地址池配置,发现DHCP地址池是192.168.1.2-192.168.1.200,为电脑配置地址池之外的IP192.168.1.201,这时到192.168.1.1是通的,然后配置到内网网段的路由即可。

对于这种情况,静态地址配置成DHCP获取到的地址无法使用,就需要配置成DHCP地址池外的地址。

centos7进入单用户模式修改密码的办法

启动linux,在这个界面时,按e,

按向下的箭头键,在linux16这一行的末尾LANG=en_US.UTF-8后面输入init=/bin/sh

然后按ctrl+x,进入单用户模式

此时在单用户模式下还不能修改密码,需要输入命令mount -o remount,rw /

然后通过passwd修改root密码,修改完成后,一定要输入touch /.autorelabel,不然启动不了

输入 touch /.autorelabel后输入exec /sbin/init即可使用刚才修改的root密码进入系统