分类目录归档:操作系统

浪潮NF5280M5安装redhat7.2下网卡驱动

驱动文档如下:

Building and Installation

To build a binary RPM* package of this driver, run ‘rpmbuild -tb
i40e-.tar.gz’, where is the version number for the driver tar file.

NOTES:

  • For the build to work properly, the currently running kernel MUST match
    the version and configuration of the installed kernel sources. If you have
    just recompiled the kernel reboot the system before building.
  • RPM functionality has only been tested in Red Hat distributions.
  1. Move the base driver tar file to the directory of your choice. For
    example, use ‘/home/username/i40e’ or ‘/usr/local/src/i40e’.
  2. Untar/unzip the archive, where is the version number for the
    driver tar file:
    tar zxf i40e-.tar.gz
  3. Change to the driver src directory, where is the version number
    for the driver tar:
    cd i40e-/src/
  4. Compile the driver module:
    make install
    The binary will be installed as:
    /lib/modules//updates/drivers/net/ethernet/intel/i40e/i40e.ko
    The install location listed above is the default location. This may differ
    for various Linux distributions.
  5. Load the module using the modprobe command:
    modprobe [parameter=port1_value,port2_value]
    Make sure that any older i40e drivers are removed from the kernel before
    loading the new module:
    rmmod i40e; modprobe i40e
  6. Assign an IP address to the interface by entering the following,
    where ethX is the interface name that was shown in dmesg after modprobe:
    ip address add / dev ethX
  7. Verify that the interface works. Enter the following, where IP_address
    is the IP address for another machine on the same subnet as the interface
    that is being tested:
    ping

NOTE:
For certain distributions like (but not limited to) RedHat Enterprise
Linux 7 and Ubuntu, once the driver is installed the initrd/initramfs
file may need to be updated to prevent the OS loading old versions
of the i40e driver. The dracut utility may be used on RedHat
distributions:
# dracut –force
For Ubuntu:
# update-initramfs -u

具体操作主要如下:

[root@host ~]# unzip PHY_i40e-2.0.23.zip

[root@host ~]# cd PHY_i40e-2.0.23/src

[root@host ~]# make install

[root@host ~]# rmmod i40e

[root@host ~]# modprobe i40e

[root@host ~]# dracut –force

[root@host ~]# service network restart

rmmod i40e的作用是删除系统中以前版本驱动,这一操作很关键。

对于浪潮NF5280M5服务器,建议安装redhat7.4及以上版本。低版本可能出现网络问题。

Red Hat Enterprise Linux Release Dates

The tables below list the major and minor Red Hat Enterprise Linux updates, their release dates, and the kernel versions that shipped with them.

Red Hat does not generally disclose future release schedules.
Refer to the Red Hat Enterprise Linux Life Cycle Policy for details on the life cycle of Red Hat Enterprise Linux releases.

To find your Red Hat Enterprise Linux release please:Raw

$ cat /etc/redhat-release

To find your kernel version please:Raw

$ uname -a

Red Hat Enterprise Linux 8

ReleaseGeneral Availability Dateredhat-release Errata Date*Kernel Version
RHEL 82019-05-074.18.0-80

Codename: Ootpa (is based on Fedora 28, upstream Linux kernel 4.18, systemd 239, and GNOME 3.28.)

Red Hat Enterprise Linux 7

ReleaseGeneral Availability Dateredhat-release Errata Date*Kernel Version
RHEL 7.62018-10-302018-10-30 RHBA-2018:30143.10.0-957
RHEL 7.52018-04-102018-04-10 RHEA-2018:07003.10.0-862
RHEL 7.42017-07-312017-07-31 RHBA-2017:18503.10.0-693
RHEL 7.32016-11-032016-11-03 RHEA-2016-25443.10.0-514
RHEL 7.22015-11-192015-11-19 RHEA-2015:24613.10.0-327
RHEL 7.12015-03-052015-03-05 RHEA-2015:05243.10.0-229
RHEL 7.0 GA2014-06-093.10.0-123
RHEL 7.0 Beta2013-12-113.10.0-54.0.1

Codename: Maipo (based on a mix of Fedora 19, Fedora 20, and several modifications)

Red Hat Enterprise Linux 6

ReleaseGeneral Availability Dateredhat-release Errata Date*Kernel Version
RHEL 6.102018-06-192018-06-19 RHBA-2018:18562.6.32-754
RHEL 6.92017-03-212017-03-21 RHSA-2017:08172.6.32-696
RHEL 6.82016-05-102016-05-10 RHSA-2016:0855-12.6.32-642
RHEL 6.72015-07-222015-07-22 RHEA-2015:14232.6.32-573
RHEL 6.62014-10-142014-10-13 RHEA-2014:16082.6.32-504
RHEL 6.52013-11-212013-11-20 RHSA-2013:1645-22.6.32-431
RHEL 6.42013-02-212013-02-21 RHSA-2013-04962.6.32-358
RHEL 6.32012-06-202012-06-19 RHSA-2012-08622.6.32-279
RHEL 6.22011-12-062011-12-06 RHEA-2011:17432.6.32-220
RHEL 6.12011-05-192011-05-19 RHEA-2011:05402.6.32-131.0.15
RHEL 6.02010-11-092.6.32-71

Codename: Santiago (based on a mix of Fedora 12, Fedora 13, and several modifications)

Red Hat Enterprise Linux 5

ReleaseGeneral Availability Dateredhat-release Errata Date*Kernel Version
RHEL 5.112014-09-162014-09-16 RHEA-2014-12382.6.18-398
RHEL 5.102013-10-012013-09-30 RHEA-2013-13112.6.18-371
RHEL 5.92013-01-072013-01-07 RHEA-2013-00212.6.18-348
RHEL 5.82012-02-202012-02-20 RHEA-2012:03152.6.18-308
RHEL 5.72011-07-212011-07-20 RHEA-2011:09772.6.18-274
RHEL 5.62011-01-132011-01-12 RHEA-2011:00202.6.18-238
RHEL 5.52010-03-302010-03-30 RHEA-2010:02072.6.18-194
RHEL 5.42009-09-022009-09-02 RHEA-2009:14002.6.18-164
RHEL 5.32009-01-202009-01-20 RHEA-2009:01332.6.18-128
RHEL 5.22008-05-212008-05-20 RHEA-2008:04362.6.18-92
RHEL 5. 12007-11-072007-11-07 RHEA-2007:08542.6.18-53
RHEL 5.02007-03-152.6.18-8

Codename: Tikanga (based on Fedora Core 6)

Red Hat Enterprise Linux 4

Release/UpdateGeneral Availability Dateredhat-release Errata Date*Kernel Version
RHEL 4 Update 92011-02-162011-02-16 RHEA-2011:02512.6.9-100
RHEL 4 Update 82009-05-192009-05-18 RHEA-2009:10022.6.9-89
RHEL 4 Update 72008-07-292008-07-24 RHEA-2008:07692.6.9-78
RHEL 4 Update 62007-11-152007-11-15 RHBA-2007:08972.6.9-67
RHEL 4 Update 52007-05-012007-04-27 RHBA-2007:01962.6.9-55
RHEL 4 Update 42006-08-102006-08-10 RHBA-2006:06012.6.9-42
RHEL 4 Update 32006-03-122006-03-07 RHBA-2006:01492.6.9-34
RHEL 4 Update 22005-10-052005-10-05 RHEA-2005:7862.6.9-22
RHEL 4 Update 12005-06-082005-06-08 RHEA-2005:3182.6.9-11
RHEL 4 GA2005-02-152.6.9-5

Codename: Nahant (based on Fedora Core 3)

Red Hat Enterprise Linux 3

Release/UpdateGeneral Availability DateKernel Version
RHEL 3 Update 92007-06-202.4.21-50
RHEL 3 Update 82006-07-202.4.21-47
RHEL 3 Update 72006-03-172.4.21-40
RHEL 3 Update 62005-09-282.4.21-37
RHEL 3 Update 52005-05-182.4.21-32
RHEL 3 Update 42004-12-122.4.21-27
RHEL 3 Update 32004-09-032.4.21-20
RHEL 3 Update 22004-05-122.4.21-15
RHEL 3 Update 12004-01-162.4.21-9
RHEL 3 GA2003-10-222.4.21-4

Codename: Taroon (based on Red Hat Linux 9)

Red Hat Enterprise Linux 2.1

Release/UpdateGeneral Availability DateKernel Version
RHEL 2.1 Update 72005-04-28
RHEL 2.1 Update 62004-12-132.4.9-e.57
RHEL 2.1 Update 52004-08-182.4.9-e.49
RHEL 2.1 Update 42004-04-212.4.9-e.40
RHEL 2.1 Update 32004-12-192.4.9-e.34
RHEL 2.1 Update 22003-03-292.4.9-e.24
RHEL 2.1 Update 12003-02-142.4.9-e.12
RHEL 2.1 GA2002-03-232.4.9-e.3

Codename: Pensacola (AS) / Panama (ES) (based on Red Hat Linux 7.2)

* Helpful when cloning channels in Satellite for a minor version plus all errata prior to the next minor release using spacewalk-clone-by-date or the webUI.

关于CentOs7使用u盘安装出现dracut:/#相关报错信息的解决方法

dracut:/#cd dev

dracut:/# ls

找到sdbx,x为一个数字,是安装u盘

dracut:/# reboot
重启之后,修改
vmlinuz initrd=initrd.img inst.stage2=hd:LABEL=CentOS\x207\x20x86_64 quiet

为 vmlinuz initrd=initrd.img inst.stage2=hd:/dev/sdbx(u盘)quiet 回车即可。

以上这个办法可行,但是有时候并不太方便获取U盘盘符,可以在安装界面修改>vmlinuz initrd=initrd.img linux dd quiet

此时可以看到U盘所在分区,比如sdc3

重启后在安装界面修改>vmlinuz initrd=initrd.img inst.stage2=hd:/dev/sdc3 quiet即可正常安装系统。

IIS中sftp允许读禁止写与允许写禁止读的配置说明

一、需求如下:
1、一台windows 2012操作系统的服务器,配置有双网卡,10.0.0.1和12.0.0.1,要开通sftp和ftp服务;
2、sftp和ftp服务共用一个默认根目录d:\ftp,在该根目录下建立两个文件目录,分别为rq和rs;
3、sftp服务开通1个sftp账号,账号名称为suser,该账号对rq文件目录有读、删除权限,对rs目录有写权限;
4、ftp服务器开通1个ftp账号,账号名称为fuser,该账号对rq文件目录有写权限,对rs目录有读、删除权限;
5、luser和fuser两个账号都不能够登录服务器操作系统。

二、配置步骤:
1、首先添加角色和功能,添加IIS,勾选安全性各项,勾选ftp服务器,勾选管理工具;

此图像的alt属性为空;文件名为image-3.png

此图像的alt属性为空;文件名为image-4.png

完成安装。
2、安装完成后,在IIS下服务器证书中可以看到SSL证书。

此图像的alt属性为空;文件名为image-5.png
此图像的alt属性为空;文件名为image-6.png

3、新建suser和fuser两个账号,都只属于IIS_IUSRS用户组,在d:\ftp下新建rs和rq两个目录。
4、新建sftp站点,

linux系统tcpdump丢包问题解决方法

在一台suse linux上使用tcpdump命令抓包,出现“packets dropped by kernel”,一般造成这种丢包的原因是libcap抓到包后,tcpdump上层没有及时取出,导致libcap缓冲区溢出,从而覆盖了未处理包,显示为dropped by kernel,这里的kernel并不是说是被linux内核抛弃的,而是被tcpdump的内核,即libcap抛弃掉。
解决方法:

根据以上分析,可以通过改善tcpdump上层的处理效率来减少丢包率,下面的几步根据需要选用,每一步都能减少一定的丢包率。

1.最小化抓取过滤范围,即通过指定网卡,端口,包流向,包大小减少包数量

2. 添加-n参数,禁止反向域名解析
tcpdump -i eth0 dst port 1234 and udp -s 2048 -n -X -tt >a.pack
大多数情况这样就可以解决
可以通过改善tcpdump上层的处理效率来减少丢包率

3. 将数据包输出到cap文件
tcpdump -i eth0 dst port 1234 and udp -s 2048 -n -X -tt -w a.cap

4. 用sysctl修改SO_REVBUF参数,增加libcap缓冲区长度

rp_filter及Linux下多网卡接收多播的问题

有一台双网卡的机器,上面装有Fedora8,运行一个程序。该程序分别在两个网口上都接收多播数据,程序运行是正常的。但是,后来升级系统到Fedora13,发现就出问题了:在运行几秒钟后,第2个网口上就接收不到多播数据了。

能不能收到多播,取决于交换机是不是往这个网口上转发多播数据。程序在起动的时候,会发一个IGMP的AddMembership的消息,交换机将把这个网口加入多播组。当在其他网口上收到该地址的多播包后,会转至这个网口。其后,为了确认该接收者一直在线,交换机会发送一个IGMPQuery消息,接收者反馈一个IGMP Report消息,以确认自己的存在。如果交换机没有收到IGMPReport,则认为该接收者已经断线,就不再往该网口上转发多播包了。

用抓包工具定位了一下,发现程序在启动时确实发了AddMembership消息,这是正常的。在接收下来的5秒时间内,程序能够收到多播数据。接着,交换机发来了一条IGMPQuery,问题来了,这个Fedora13系统却没有反馈Report。这是很奇怪的。按理说,IGMP属于系统自动完成的协议,无需用户干预;那么按照预期,Linux会自动反馈IGMPReport的。事实上,Feodra8和WinXP系统就是这么做的,都很正常。为什么到了Fedora13反而不正常了呢?

在调查“为什么不反馈IGMPReport”的事情上,花了一周时间都没有进展,后来发现其实不至Fedora13,其他的主流linux如Ubuntu10,SUSE14也存在同样的问题。

查了众多论坛都没有一点提示信息。后来,终于在一个英文网站上扫到了一个信息:rp_filter。后来证明,这个关键词是解决问题的关键。reverse-pathfiltering,反向过滤技术,系统在接收到一个IP包后,检查该IP是不是合乎要求,不合要求的IP包会被系统丢弃。该技术就称为rpfilter。怎么样的包才算不合要求呢?例如,用户在A网口上收到一个IP包,检查其IP为B。然后考查:对于B这个IP,在发送时应该用哪个网口,“如果在不应该接收到该包的网口上接收到该IP包,则认为该IP包是hacker行为”。

例如:

A: 192.168.8.100

B: (IGMP Query) 10.0.0.1 来自路由器

查找路由表

网卡1为默认路由: 172.17.5.100  172.17.5.1

网卡2          192.168.8.100  192.168.8.1

系统根据路由表,认为10.0.0.1这个IP应该在第一个网卡172.17.5.100上收到,现实的情况是在第二张网卡192.168.8.100上收到了。认为这是不合理的,丢弃该包。致命的问题的,该包是来自路由器的IGMPQuery包。

The rp_filter can reject incoming packets if their sourceaddress doesn’t match the network interface that they’re arrivingon, which helps to prevent IP spoofing. Turning this on, however,has its consequences: If your host has several IP addresses ondifferent interfaces, or if your single interface has multiple IPaddresses on it, you’ll find that your kernel may end up rejectingvalid traffic. It’s also important to note that even if you do notenable the rp_filter, protection against broadcast spoofing isalways on. Also, the protection it provides is only against spoofedinternal addresses; external addresses can still be spoofed.. Bydefault, it is disabled.

解决方法:

系统配置文件
1. /etc/sysctl.conf
把 net.ipv4.conf.all.rp_filter和net.ipv4.conf.default.rp_filter设为0即可
net.ipv4.conf.default.rp_filter = 0
net.ipv4.conf.all.rp_filter = 0
系统启动后,会自动加载这个配置文件,内核会使用这个变量

2. 命令行
显示一个内核变量 sysctl net.ipv4.conf.all.rp_filter
设置一个内核变量 sysctl -w net.ipv4.conf.all.rp_filter=0
设置完后,会更新内核(实时的内存)中的变量的值,但不会修改sysctl.conf的值

3. 使用/proc文件系统
查看 cat /proc/sys/net/ipv4/conf/all/rp_filter
设置 echo “0”>/proc/sys/net/ipv4/conf/all/rp_filter

sysctl.conf文件参数rp_filter

系统:Centos6

影响:

路径:/etc/sysctl.conf

rp_filter – INTEGER 0 – No source validation.
1 – Strict mode as defined in RFC3704 Strict Reverse Path Each incoming packet is tested against the FIB and if theinterface is not the best reverse path the packet check will fail.By default failed packets are discarded.
2 – Loose mode as defined in RFC3704 Loose Reverse Path Each incoming packet’s source address is also tested against theFIB and if the source address is not reachable via any interface the packet check will fail.Current recommended practice in RFC3704 is to enable strictmode to prevent IP spoofing from DDos attacks. If using asymmetricrouting or other complicated routing, then loose mode is recommended.

The max value from conf/{all,interface}/rp_filter is used when doing source validation on the {interface}.

Default value is 0. Note that some distributions enable it in startup scripts.
—–

Red Hat are (correctly) setting rp_filter to 1, strictmode.  In this case a packet coming in eth0 willhave its source address routed out on the same interface that itcame in on (because that’s the default route). However, a packet coming in on eth1 will have it source addressrouted out on a different interface to the one it came in on and itwill be discarded.  Silently.

This is basically asymmetric routing and is quite possibly not whatyou want anyway (it messes up TCP flow control) so there are twoways to fix this: stick with asymmetric routing and permit it orfix the asymmetric routing.

The first one is easiest: in /etc/sysctl.conf change rp_filter=1 torp_filter=2).  You’ll need to load that andrestart the network.  It’s probably easiest toreboot 🙂 to be sure.  I suspect that it was notrestarting enough things that prevented this change from workingbefore.

The second one may be simple as simple as adding those routes thatshould go out on eth1 to the routing table or running some routingdaemon.  It depends on your network topology,basically.  This would be the preferred solutionif it’s practicable.

reverse-pathfiltering,反向过滤技术,系统在接收到一个IP包后,检查该IP是不是合乎要求,不合要求的IP包会被系统丢弃。该技术就称为rpfilter。怎么样的包才算不合要求呢?例如,用户在A网口上收到一个IP包,检查其IP为B。然后考查:对于B这个IP,在发送时应该用哪个网口,“如果在不应该接收到该包的网口上接收到该IP包,则认为该IP包是hacker行为”。

解决方法:

系统配置文件
1. /etc/sysctl.conf
把 net.ipv4.conf.all.rp_filter和net.ipv4.conf.default.rp_filter设为0即可
net.ipv4.conf.default.rp_filter = 0
net.ipv4.conf.all.rp_filter = 0

net.ipv4.conf.eth0.rp_filter = 0
net.ipv4.conf.eth1.rp_filter = 0

net.ipv4.conf.lo.rp_filter = 0

系统启动后,会自动加载这个配置文件,内核会使用这个变量

2. 命令行
显示一个内核变量 sysctl net.ipv4.conf.all.rp_filter
设置一个内核变量 sysctl -w net.ipv4.conf.all.rp_filter=0
设置完后,会更新内核(实时的内存)中的变量的值,但不会修改sysctl.conf的值

3. 使用/proc文件系统
查看 cat /proc/sys/net/ipv4/conf/all/rp_filter
设置 echo “0”>/proc/sys/net/ipv4/conf/all/rp_filter

sysctl常用命令

sysctl -a 查看所有参数

sysctl -p 加载配置文件

sysctl对Linux内核/网络的设置说明

通过/etc/sysctl.conf控制和配置Linux内核及网络设置。

#忽略icmp ping广播包,应开启,避免放大攻击
net.ipv4.icmp_echo_ignore_broadcasts = 1

# 开启恶意icmp错误消息保护
net.ipv4.icmp_ignore_bogus_error_responses = 1

# 开启SYN洪水攻击保护,表示开启SYN Cookies。当出现SYN等待队列溢出时,启用cookies来处理,可防范少量SYN攻击,默认为0,表示关闭
net.ipv4.tcp_syncookies = 1

# 开启并记录欺骗,源路由和重定向包
net.ipv4.conf.all.log_martians = 1
net.ipv4.conf.default.log_martians = 1

# 处理无源路由的包
net.ipv4.conf.all.accept_source_route = 0
net.ipv4.conf.default.accept_source_route = 0

# reverse-pathfiltering 反向路径过滤,系统收到一个ip包后,会反查该ip包的ip是否与它们到达的网络接口匹配,若不匹配则丢弃。是防ip包欺骗策略。

# The rp_filter can reject incoming packets if their sourceaddress doesn’t match the network interface that they’re arrivingon, which helps to prevent IP spoofing. Turning this on, however,has its consequences: If your host has several IP addresses ondifferent interfaces, or if your single interface has multiple IPaddresses on it, you’ll find that your kernel may end up rejectingvalid traffic. It’s also important to note that even if you do notenable the rp_filter, protection against broadcast spoofing isalways on. Also, the protection it provides is only against spoofedinternal addresses; external addresses can still be spoofed.. Bydefault, it is disabled.
net.ipv4.conf.all.rp_filter = 1
net.ipv4.conf.default.rp_filter = 1

#关闭重定向。如果主机所在的网络有多个路由器,你将其中一个设为缺省网关,但该网关在收到你的ip包时,发现该ip包必须经过另外一个路由器,于是该网关就給你的主机发一个“重定向”的icmp包,告诉主机把包转发到另外一个路由器。1表示主机接受这样的重定向包,0表示忽略;linux默认是1,可以设位0以消除隐患。
net.ipv4.conf.all.accept_redirects = 0
net.ipv4.conf.default.accept_redirects = 0
net.ipv4.conf.all.secure_redirects = 0
net.ipv4.conf.default.secure_redirects = 0

#禁止数据包转发,不做路由器功能。所谓转发即当主机拥有多网卡时,其中一块收到数据包,根据数据包的目的ip地址将包发往本机另一网卡,该网卡根据路由表继续发送数据包。这通常就是路由器所要实现的功能。

#对比网关:内网主机向公网发送数据包时,由于目的主机跟源主机不在同一网段,所以数据包暂时发往内网默认网关处理,而本网段的主机对此数据包不做任何回应。由于源主机ip是私有的,禁止在公网使用,所以必须将数据包的源发送地址修改成公网上的可用ip,这就是网关收到数据包之后首先要做的工作–ip转换。然后网关再把数据包发往目的主机。目的主机收到数据包之后,只认为这是网关发送的请求,并不知道内网主机的存在,也没必要知道,目的主机处理完请求,把回应信息发还给网关。网关收到后,将目的主机发还的数据包的目的ip地址修改为发出请求的内网主机的ip地址,并将其发给内网主机。这就是网关的第二个工作–数据包的路由转发。内网的主机只要查看数据包的目的ip与发送请求的源主机ip地址相同,就会回应,这就完成了一次请求。 net.ipv4.ip_forward = 0
net.ipv4.conf.all.send_redirects = 0
net.ipv4.conf.default.send_redirects = 0

# 开启execshield,execshield 主要用于随机化堆栈地址,避免被exploit 程序修改恶意地址,而导致执行攻击程序。
kernel.exec-shield = 1
kernel.randomize_va_space = 1

# IPv6设置
net.ipv6.conf.default.router_solicitations = 0
net.ipv6.conf.default.accept_ra_rtr_pref = 0
net.ipv6.conf.default.accept_ra_pinfo = 0
net.ipv6.conf.default.accept_ra_defrtr = 0
net.ipv6.conf.default.autoconf = 0
net.ipv6.conf.default.dad_transmits = 0
net.ipv6.conf.default.max_addresses = 1

# 增加系统文件描述符限制
fs.file-max = 65535

# 允许更多的PIDs (减少滚动翻转问题);
may break some programs 32768
kernel.pid_max = 65536

# 增加系统IP端口限制 n
et.ipv4.ip_local_port_range = 2000 65000

# 增加TCP最大缓冲区大小
net.ipv4.tcp_rmem = 4096 87380 8388608
net.ipv4.tcp_wmem = 4096 87380 8388608

# 增加Linux自动调整TCP缓冲区限制

# 最小,默认和最大可使用的字节数

# 最大值不低于4MB,如果你使用非常高的BDP路径可以设置得更高

# Tcp窗口等
net.core.rmem_max = 8388608
net.core.wmem_max = 8388608
net.core.netdev_max_backlog = 5000
net.ipv4.tcp_window_scaling = 1

Suse linux 11配置多网卡后网络不通的解决办法

问题描述

1.RH2288-1、RH2288-2安装的是SUSE11操作系统。
2.服务器采的是双网卡绑定,bond0在VLAN100、bond1在VLAN200。
3.VLAN100的网关为172.16.0.1、VLAN200的网关为192.168.0.1。
RH2288-1的默认网关为192.168.0.1,RH2288-2的默认网关为172.16.0.1。
4.RH2288-2 ping RH2288-1的bond1网卡 192.168.0.187不通。

告警信息
FY-NMS:~ # ping -c 1 192.168.0.187
PING 192.168.0.187 (192.168.0.187) 56(84) bytes of data.
— 192.168.0.187 ping statistics —
1 packets transmitted, 0 received, 100% packet loss, time 0ms

处理过程
1.在RH2288-1、RH2288-2 ping 各自默认网关是否正常。
结果正常,无丢包。
2.检查RH2288-1、RH2288-1默认网关配置正确。
RH2288-1配置正确,检查结果如下:
FY-HIS:/etc # route -n
Kernel IP routing table
Destination Gateway Genmask Flags Metric Ref Use Iface
0.0.0.0 192.168.0.1 0.0.0.0 UG 0 0 0 bond1
RH2288-2配置正确,检查结果如下:
FY-NMS ~ # route
Kernel IP routing table
Destination Gateway Genmask Flags Metric Ref Use Iface
default 172.16.0.1 0.0.0.0 UG 0 0 0 bond0
3.在RH2288-1抓取网络数据包,是否能收到RH2288-2请求的ping请求。
FY-HIS:~ # tcpdump -ni bond1 icmp
tcpdump: verbose output suppressed, use -v or -vv for full protocol decode
listening on bond1, link-type EN10MB (Ethernet), capture size 96 bytes
09:45:38.900680 IP 172.16.0.188 > 192.168.0.188: ICMP echo request, id 24523, seq 54, length 64
09:45:39.908686 IP 172.16.0.188 > 192.168.0.188: ICMP echo request, id 24523, seq 55, length 64
09:45:40.916731 IP 172.16.0.188 > 192.168.0.188: ICMP echo request, id 24523, seq 56, length 64
09:45:41.924674 IP 172.16.0.188 > 192.168.0.188: ICMP echo request, id 24523, seq 57, length 64
4.根据抓包显示,从RH2288-2 ping RH2288-1 192.168.0.188不通,是因为在RH2288-1上只能抓到RH2288-2的request报文,但没有抓到RH2288-1 的reply的报文。

原因
问题产生的根因应该是SUSE 系统路由表策略,优先级低的路由,它不回复对端的arp请求。

解决方案
1.sysctl -a |grep rp_fi,查看返回值是否都为0。
2.将不为0的值改为0。
如net.ipv4.conf.all.rp_filter = 1,则修改sysctl -w net.ipv4.conf.all.rp_filter=0
3.将该修改值写入配置文件:
vi /etc/sysctl.conf
在该文件中将需要修改为0的值进行更改,需要注意格式与文件中其他配置一致。

建议与总结
在处理服务器侧网络不通时,建议多使用抓包的方法,通过分析网络报文快速定位问题。

Linux LVM分区扩容方法

现有一台Linux服务器,采用LVM分区,现在新增一块10G硬盘,需将10G硬盘扩容给/data分区,操作步骤如下:

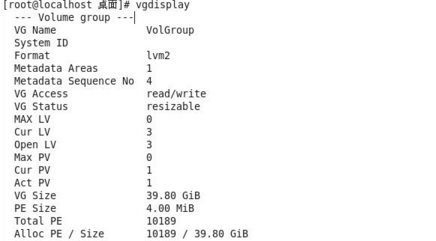
1、vgdisplay查看vg,vg name为VolGroup

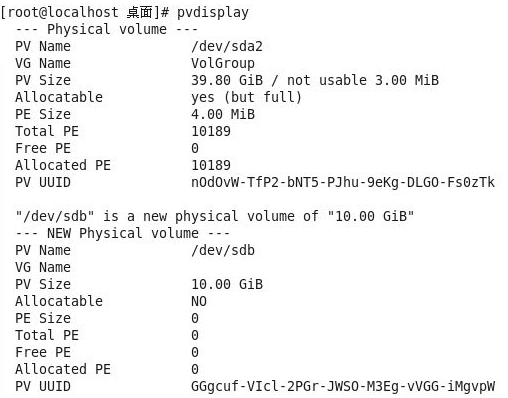
2、fdisk -l查看新增硬盘为sdb,
pvcreat /dev/sdb
pvdisplay查看pv

3、df -h
查看/data所在的逻辑卷的名称

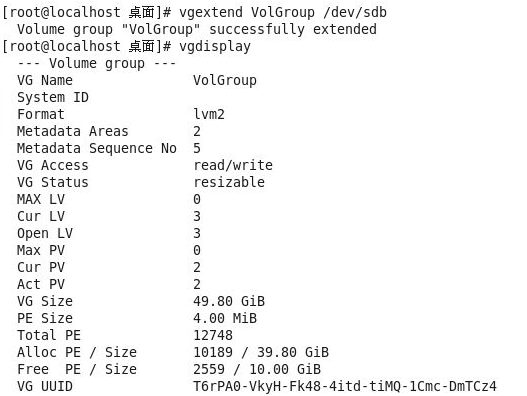
4、将/dev/sdb增加到vg里,vg name为VolGroup
查看vg,vg容量已经由39.8G变为49.8G

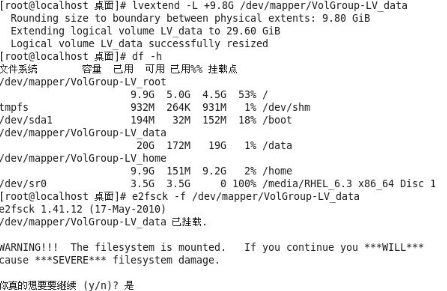
5、lvextend -L +9.8G 将9.8G增加到文件系统

6、df -h后容量没变,还需要
#e2fsck -f /dev/mapper/VolGroup-lv_root
#resize2fs /dev/mapper/VolGroup-lv_root

7、df -h已经可以看到/data已经由20G变为30G